Introduction #
Thank you for purchasing an Electroconcept product.
Please read carefully the following guide before using DMX-to-signal board for WS2812 digital LED strips and RISCV-compatible.
Responsibility:
Electroconcept can’t be held responsible for any damage caused by a misuse of any kind such as loss of utilizing, consumable destruction (tapes, CDs, LED Strips, etc.) or any other financial loss due to an unappropriate use of our products or any impossibility to use them; so as any wiring mistake during the installation.
Guarantee:
Electroconcept products benefit from a two years manufacturer guarantee (electronic components only, except consumable ones e.g plastic components). The product must be returned to Electroconcept postage paid and in its original package. If not, the package will be refused and returned to sender. Electroconcept company is in charge of the product restitution.
Are excluded of the guarantee benefits the followings : any damage caused by carelessness, mistake, lack of maintenance by the user (broken, burned, heated, soaked, silted up, etc.); wrong installation or misuse by the user. All our products are tested before sending to buyers. Modifications of any kind are at your own risk and out of guarantee benefits.
Technical specifications #
- Power supply : DC + 5 V + 24 V
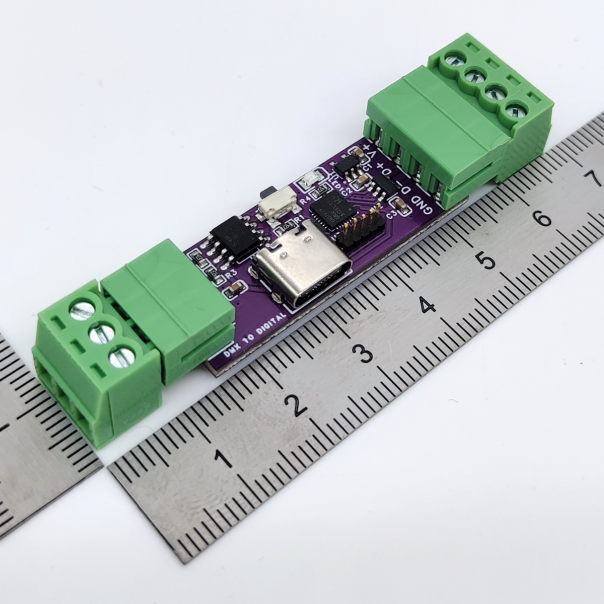
- Dimensions : 39 mm (board only, connectors excluded) / 65 mm (connectors included) X 15 mm
- Up to 8 universes, or 1360 RGB pixels per board.
- Balanced SPI Output
- All SPI no Clock signals compatible, adjustable timings.
Connexion tips #
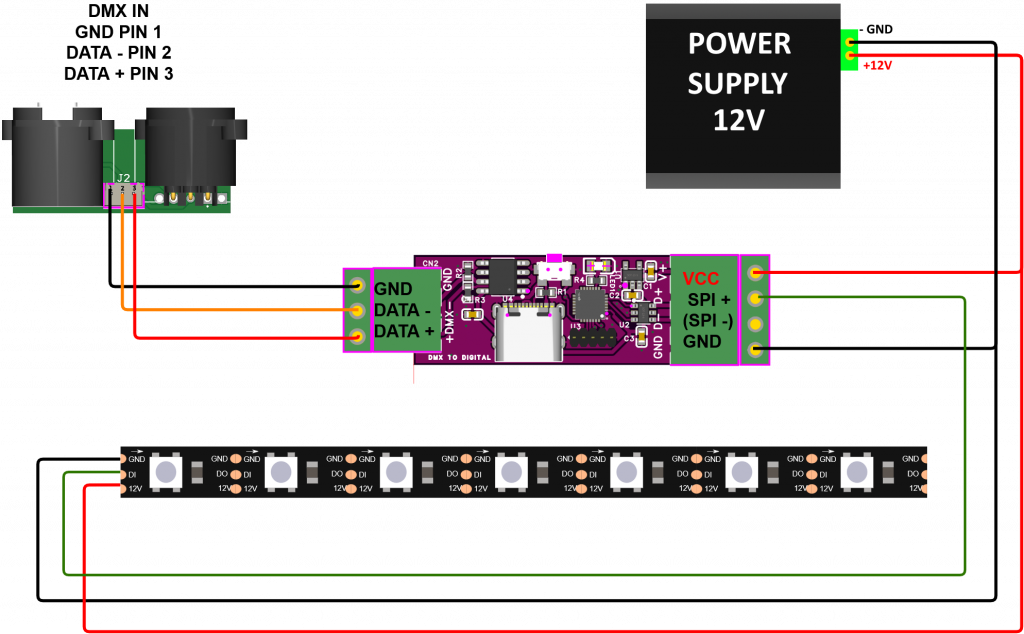
12 V WS2815 LED Strip connection:
Fixtures and addresses setting #
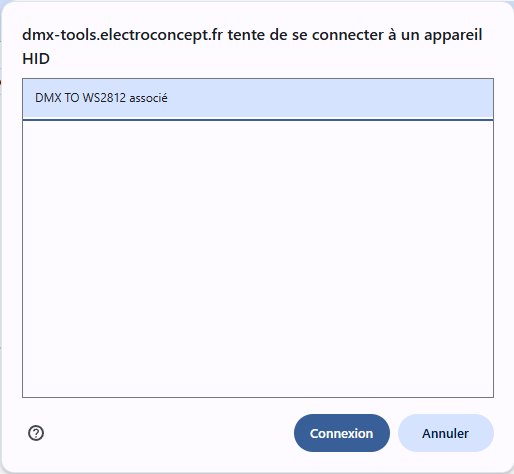
DMX addressing is done at https://dmx-tools.electroconcept.fr/ connecting the board with a USB cable. By default DMX address is 001.
- Make sure the board you want to set up is switched OFF,
- Open the web page on a browser compatible with USB HID standard like Google Chrome on Pc or Opera on Mac,
- Connect your board, then go at https://dmx-tools.electroconcept.fr/ and click on Connect,
- Choose your device in the pop-up window and click on Connect,
- By default the board is configured as DMX address 001.
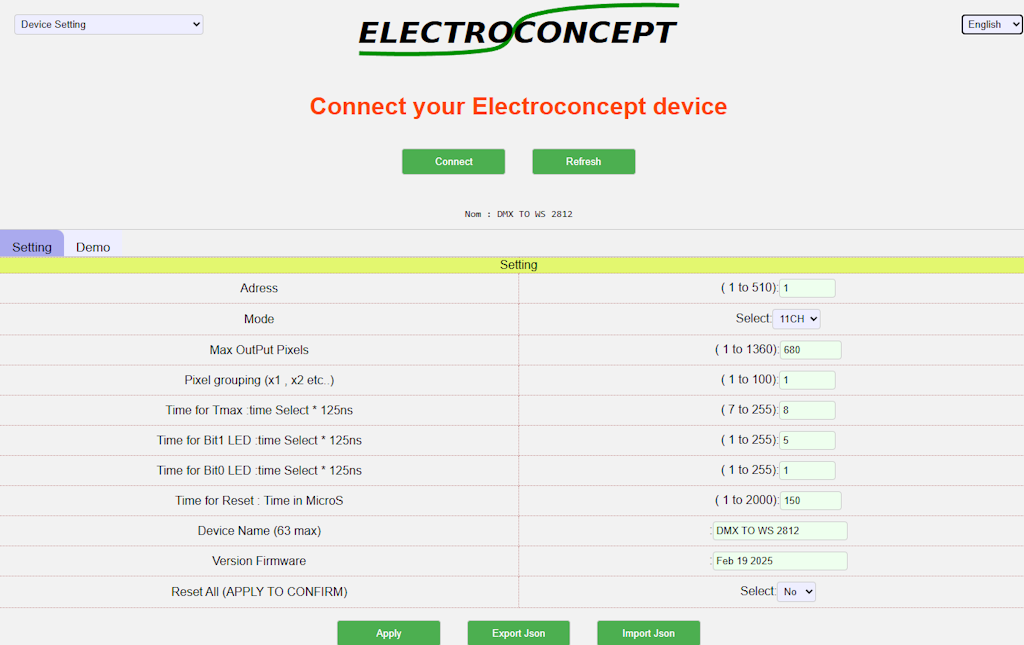
Adjustable setting:
Address (put 0 for DIPSWITCH) : Allows to select the address by leaving the Dip Switch set to OFF. Please note that the Dip Switch address always takes priority.
Mode : Allows to choose the board fixture in Pixel to Pixel in Direct mode or in 11 channels effect generator mode.
Max OutPut Pixels : Maximum number of pixels to control.
Pixel grouping (x1, x2 etc.) : Allows to artificially group pixels of the LED Strip to save channels in Pixel to Pixel mode.
Time for Tmax :time Select * 125ns : Maximum time setting of your DATA frame (generally Bit 0 time + Bit 1 time)
Time for Bit1 LED :time Select * 125ns : Time setting parameter corresponding to 1 on your DATA frame (often noted as T1H in technical specification sheets).
Time for Bit0 LED :time Select * 125ns : Time setting parameter corresponding to 0 on your DATA frame (often noted as T0H in technical specification sheets).
Time for Reset : Time in MicroS : Time reset setting parameter of DATA frame.
Device Name (63 max) : Board name on DMX TOOLS.
Reset All (APPLY TO CONFIRM) : Back to default setting.
Fixtures details available on the board :
1CH Pixel To Pixel Mode
DMX channels description : each DMX channel corresponds to the color components’ value of each pixel.
11CH Effector Mode
DMX channels description : 11 channels Fixture
| CHANNEL | VALUE | FEATURE |
| Choice of program 1 | 0 – 15 | Pixel to Pixel Mode |
| 2 | 0 – 255 | 1st color component’s value of the 1st Pixel (generally Red) |
| 3 | 0 – 255 | 2nd color component’s value of the 1st Pixel (generally Green) |
| 4 | 0 – 255 | 3rd color component’s value of the 1st Pixel (generally Blue) |
| 5 | 0 – 255 | 1st color component’s value of the 2nd Pixel (generally Red) |
| 6 | 0 – 255 | 2nd color component’s value of the 2nd Pixel (generally Green) |
| 7 | 0 – 255 | 3rd color component’s value of the 2nd Pixel (generally Blue) |
| ……. | 0 – 255 | Colors value of the Pixel… |
| CHANNEL | VALUE | FEATURE |
| 1 Effect’s choice | 16 – 31 32-47 48-63 64-79 80-95 96-111 112-127 128-143 144-159 160-175 176-191 192-207 208-223 224-239 240-255 | Pixels in running light mode Pixels in back and forth Pixels in ping pong Pixels in gathering or spacing Pixels in random, channel 3 for strob Color filling Color filling reverse effect Color filling and disappearance Linear chase effect Reverse linear chase effect Back and forth chase effect Back and forth chase effect with color offset Sine ↔ back and forth Sine ↔ back and forth with color offset Sine → forth with color offset |
| 2 Effect’s Dimmer | 0 – 255 | Dimmer’s value |
| 3 Effect’s speed | 0 – 126 127 128 – 255 | slow to fast in one direction standstill effect slow to fast in the opposite direction |
| 4 Effect fade | 0 1- 255 | No fade out Low to high fade out |
| 5 Number of Pixels | 0 1 – 255 | No effect Number of Pixels + 1 involved in the effect |
| 6 1st effect color | 0 – 255 | 1st color component’s value of the effect (generally Red) |
| 7 2nd effect color | 0 – 255 | 2nd color component’s value of the effect (generally Green) |
| 8 3rd effect color | 0 – 255 | 3rd color component’s value of the effect (generally Blue) |
| 9 1st background color | 0 -255 | 1st color component’s value of the effect (generally Red) |
| 10 2nd background color | 0 – 255 | 2nd color component’s value of the effect (generally Green) |
| 11 3rd background color | 0 – 255 | 3rd color component’s value of the effect (generally Blue) |
- In the 11 CH Mode effect generator, channel 1 is determined by the choice of the effect with:
- Program 1 : Pixels’ colors on 511 additional channels
- Programs 2 to 16 : Effect settings on 10 additional channels
- If you use a LED Strip with inverted colors, for example Green Red Blue, remember to modify your Patch accordingly.
Utilisation #
Ensure that your wiring complies with the connection diagram.
When your device is switched on, the board will automatically check that a DMX signal is present. Once it is done, the DMX LED should light up according to DMX frames pace.
With your console set to the operating mode (Fixture) and the assigned address, you can now control the output levels of the DMX board for WS2812 Digital LED Strips and RISCV-compatible.


