Introduction #
Thank you for purchasing an Electroconcept product.
Please read carefully the following guide before using DMX HF 2.4 GHz V2.2 Lite Emitter and Art-Net WIFI Node.
Responsibility:
Electroconcept can’t be held responsible for any damage caused by a misuse of any kind such as loss of utilizing, consumable destruction (tapes, CDs, LED Strips, etc.) or any other financial loss due to an unappropriate use of our products or any impossibility to use them; so as any wiring mistake during the installation.
Guarantee:
Electroconcept products benefit from a two years manufacturer guarantee (electronic components only, except consumable ones e.g plastic components). The product must be returned to Electroconcept postage paid and in its original package. If not, the package will be refused and returned to sender. Electroconcept company is in charge of the product restitution.
Are excluded of the guarantee benefits the followings : any damage caused by carelessness, mistake, lack of maintenance by the user (broken, burned, heated, soaked, silted up, etc.); wrong installation or misuse by the user. All our products are tested before sending to buyers. Modifications of any kind are at your own risk and out of guarantee benefits.
Technical specifications #
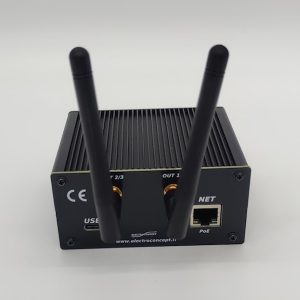
- Power supply: DC USB 5 V
- Consumption: 150 mA – 200 mA according to DMX charge
- Dimensions : 109 mm X 84 mm X 45 mm
- HF Power in 2.4 GHz : 20 db or 100 mW
- Frequency: 21
- Possible universes: 31 or 15872 DMX channels
- USB Input “OPEN DMX”
- XLR Input 3-pin or 5-pin
- XLR Output 3-pin or 5-pin
- Protocol: W2.4EC-DMX-A and B
The range depends on the environment, approximately 30 m in hostile environments (between thick walls, for example) and approximately 300 m outdoors.
Default configuration #
The emitter’s function is to transmit wired DMX to HF DMX on universe ID 1. Each receiver has a memory that allows it to send back the last value received if there is a loss of HF connection.
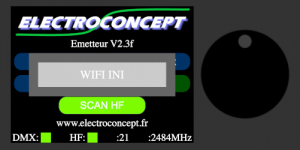
When starting up, the emitter continuously scans the frequencies to find the best available frequency for transmission.
Emitters are factory set to universe ID 1.
CAUTION : Before making any adjustment to the emitter, ensure the DMX and HF indicator lights are green. If the DMX indicator light is red, check your XLR connection to DMX IN, USB or Art-Net.

Emitter menus #
To ensure smooth operation of your emitter, here is a detailed guide to the settings that can be adjusted on it.
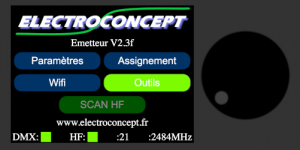
From the home screen, four menus are accessible: Settings, Assignment, Tools, WIFI and HF Scan
To navigate through all the emitter menus, use the directional wheel: turn the wheel to reach the desired menu and press the wheel to enter the desired menu; to exit, select back and press the directional wheel again; if there is no back option, press the wheel to exit the menu.

Settings #
This menu provides access to the emitter settings such as : ID universe, frequency, power, protocol in use, number of channels to send, DMX synchronization, DMX channel, DMX Backup mode, language (French or English).

- D: choice of universe ID
- Frequency: AUTO or Frequency 1 to 21, please refer to the frequency table
- HF Power: 1 to 20 db
- Protocol: choice of protocol W2.4EC_DMX-B or W2.4EC_DMX-A
- Channels to send: 512
- DMX Synchronization: YES / NO
- DMX value at startup:
- DMX Channel : 001 to 255
- DMX Backup mode : YES / NO
- Language : french or English.
Assignement #
In classic mode #
This menu allows you to assign your receivers to the ID universe and/or the address of the DMX HF receiver of your choice. When you enter the Assignment setting, a verification message automatically appears on the screen:
Note: in the case of an HF to DMX receiver board, there is no need to set the address; the product address takes precedence.

- Connect the emitter electrically with its USB cable, ensuring that the antenna is also screwed onto the device;
- Go to the Assignment menu on your emitter, select the ID of your HF DMX universe and the DMX address if necessary for your HF DMX receivers;
- To select the desired universe and address, move around the screen using the directional wheel and press the highlighted name, then turn the wheel to the value you want to set, press the wheel to confirm your choice and exit the value you are editing to edit another one;
- Once you have selected the universe and address at the top of the screen, remain in this menu and switch on your device. The antenna icon with the message ‘assignment in progress’ will flash slowly;
- The LEDs on your DMX devices will flash six times quickly to confirm that they have received the assignment information, then flash slowly while searching for a DMX HF signal;
- Once the assignment has been completed, perform a transmission test to verify that the information has been received correctly.
CAUTION: when assigning your devices to a different ID universe than the default, for example ID universe 1, remember to also change the ID universe of the emitter, otherwise there will be no connection between the emitter and your entire DMX HF device.
Example: you want to assign your device to universe ID 5. Start the assignment procedure with all the devices to be assigned switched off. Once the universe settings have been made, switch them all on so that they take on the requested information. Then, exit assignment mode and go to the emitter settings to instruct the emitter to transmit on universe ID 5 so that there is a connection between all your HF devices.
In expert mode #
Expert assignment mode allows you to adjust the settings of the products you use.
Note: These settings depend on the parameters of your receivers. Only highly qualified individuals may access this level of settings.

Tools #
Tools menu allows to visualize DMX values, to scan available frequencies and to update your DMX products.
DMX Value #
By going to this menu, you can see all DMX values sent on the DMX Input.

HF analyzer #
HF analyzer allows to see 2.4GHz frequencies occupancy.
Description of HF channels level 1 to 21, that is, over the entire frequency range of the emitter.

Table of authorised frequencies according to Decision No. 03-908 of the Telecommunications Regulatory Authority:
| 1 | 2404 Mhz |
| 2 | 2408 Mhz |
| 3 | 2412 Mhz |
| 4 | 2416 Mhz |
| 5 | 2420 Mhz |
| 6 | 2424 Mhz |
| 7 | 2428 Mhz |
| 8 | 2432 Mhz |
| 9 | 2436 Mhz |
| 10 | 2440 Mhz |
| 11 | 2444 Mhz |
| 12 | 2448 Mhz |
| 13 | 2452 Mhz |
| 14 | 2456 Mhz |
| 15 | 2460 Mhz |
| 16 | 2464 Mhz |
| 17 | 2468 Mhz |
| 18 | 2472 Mhz |
| 19 | 2476 Mhz |
| 20 | 2480 Mhz |
| 21 | 2483,5 Mhz |
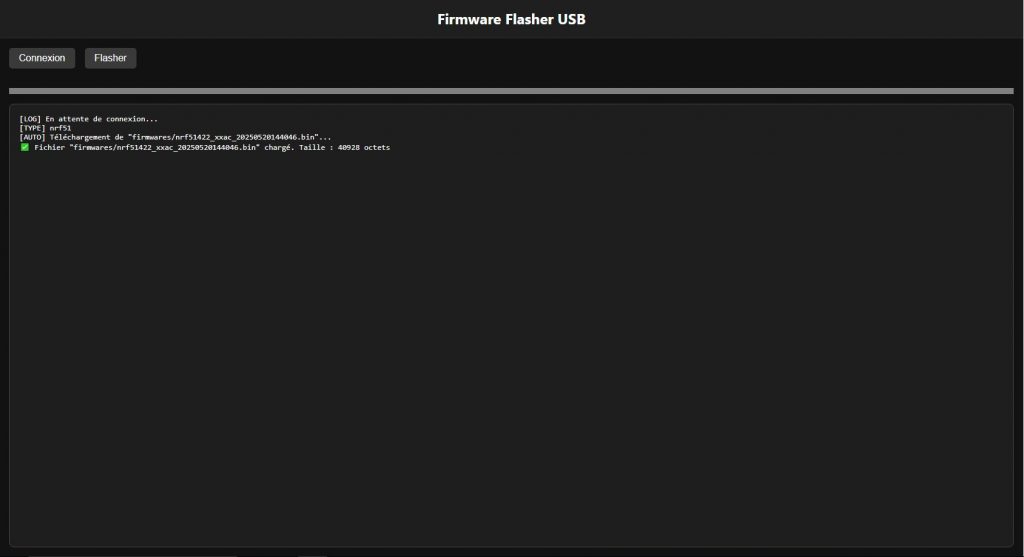
MaJ OnAir #
This menu allows to update DMX receivers via HF, that is wireless.
Receivers you are using can be updated continuously and simultaneously flash a series of Electroconcept receivers.
Receivers update:
- Connect the emitter to your PC via USB;
- ensure that your receivers to be updated are switched off;
- launch the On-Air update on your emitter as indicated below;
- on your computer, to access the last available update of your Electroconcept receivers, you must first request authorization from our team at electroconcept@electroconcept.fr to go to the web page containing the update for your receiver;
- open the link you received in your browser;
- connect the receiver via USB on your PC;
- click on Connect;
- select the receiver in the pop-up window and click on Connect;
- click on flash and validate the information;
- the update starts when you switch on your receivers, receivers’ LED flashes slowly, then once the procedure is complete, it flashes every second;
- it is possible to flash several receivers at the same time;
- the update is proceeding correctly when information or small dots scroll across the emitter screen.
Caution : if you switch one or several receivers off and on again during the update, it restarts the programming from the beginning.


Emitter update :
- on your computer, to access the last available update of your Electroconcept emitter, you must first request authorization from our team at electroconcept@electroconcept.fr to go to the web page containing the update for your emitter;
- open the link you received in your browser;
- connect the emitter via USB on your computer;
- click on Connect;
- select the receiver in the pop-up window and click on Connect;
- click on flash and validate the information;
Wifi #
The Wi-Fi menu allows you to configure your device’s Wi-Fi connection.
Electart: choice of Wifi networt number
Wifi password: 01234567 default password, sinon choix parmi les mots de passe prédéfinis dans ce menu.
Wifi channel : choice of wifi channel.
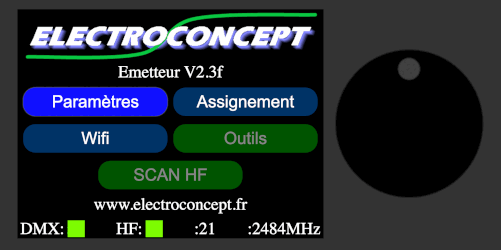
Table of channels associated with authorised Wi-Fi frequencies
| canal | fréquence en GHz |
| 1 | 2,412 |
| 2 | 2,417 |
| 3 | 2,422 |
| 4 | 2,427 |
| 5 | 2,432 |
| 6 | 2,437 |
| 7 | 2,442 |
| 8 | 2,447 |
| 9 | 2,452 |
| 10 | 2,457 |
| 11 | 2,462 |
| 12 | 2,467 |
| 13 | 2,472 |
Art-Net technical characteristics are as follow:
The Node address is: 2.0.0.1 and the broadcast address is 2.255.255.255. These addresses are fixed.
The Node universe is 0.
The Node address is automatic in DHCP.
The maximum frequency of the Node is 33 Hz, but a frequency of 25 Hz is recommended for optimal use.
Caution : by convention in the Art-Net standard, the first universe starts at 0. We have chosen to follow the Art-Net standard. Therefore, for all universes settings, the first universe is called 0.
Scan HF #
This menu restarts an HF scan. This button is only available in Auto mode and when the emitter is started up.
If you remove Auto mode and set this frequency in the settings menu, the emitter will no longer scan anything.
To change the auto mode, go to the settings menu, select frequency: auto > frequency selection.

Usage #
The use of HF Electroconcept products does not change how you use your DMX devices.
The technology used in this product enables complete transparency between your devices.
All 512 channels are sent. Frame synchronisation ensures no latency between the emitter and receiver.
N.B: All your products that use built-in receivers can be used with a cable connection. The receiver has a standby mode that activates if a DMX connection is detected at the device input.
Direct in USB #
The interface used by the emitter is compatible with the ENTTEC OPEN DMX standard. If necessary, the required drivers can be downloaded from the following address:
https://ftdichip.com/drivers/d2xx-drivers/
Here are some compatible software : Freestyler DMX, QLight Controller+, DMX Control, LightFactory, MadMapper, Millumin, LightKey…

With a console or an external adaptor via DMX IN #
If you are using an external console or adapter such as Daslight, Sunnite, Sweetlight or Wolfmix, connect the DMX cable to the DMX IN XLR socket on the emitter; the DMX indicator light should turn green.


